


Maps and Map Reading
A map is a two-dimensional representation of the three-dimensional world you'll be hiking in.
All maps will have some basic features in common and map reading is all about learning to understand their particular "language." You'll end up using a variety of maps to plan and run your trip but perhaps the most useful map is a topographic map. A topographic map uses markings such as contour lines to simulate the three-dimensional topography of the land on a two-dimensional map. In the U.S. these maps are usually U.S. Geological Survey (USGS) maps. Other maps that you'll find helpful are be local trail maps which often have more accurate and up-to-date information on specific trails than USGS maps do. Here's a brief overview of the basic language of maps.
Maps | Lat-Long | Scale | Symbols/Colors | Legend | Contour | Measuring Distances | Compass
Finding North | Declination | Bearings | Map and Compass Together
Finding North | Declination | Bearings | Map and Compass Together
| Map Size | Scale | Covers | Map to Landscape | Metric |
| 7½ Minute | 1:24,000 | 1/8 of a degree | 1 inch = 2,000 feet (3/8 mile) 2.64 inches = 1 mile |
1 centimeter = 240 meters |
| 15 minute | 1:62,500 | ¼ of a degree | 1 inch = ~1 mile | 1 centimeter = 625 meters |
| Declination or Degrees Off Course | Error Off Target after Walking 10 Miles |
| 1° | 280 meters |
| 5° | 1,402 meters |
| 10° | 2,795 meters |
If the declination is... |
Then... |
Map Bearing to Magnetic Bearing | Magnetic Bearing to Map Bearing |
West |
Magnetic North < True North Map Bearing is < the Magnetic Bearing | Map Bearing + Declination = Magnetic Bearing | Magnetic Bearing - Declination = Map Bearing |
East |
Magnetic North > True North Map Bearing is > the Magnetic Bearing | Map Bearing - Declination = Magnetic Bearing | Magnetic Bearing + Declination = Map Bearing |
ORIENTEERING
My ancestors wandered lost in the wilderness for forty years because even in biblical times, men would not stop to ask for directions. - Elayne Boosler, Comedienne

Compass and Map Relay Game
Compass Game - Blind Compass Walk
Compass Game for Beginners - Cards
Compass Game for Beginners - Instructions
Compass Game - Frisbee Golf
Compass Game - Maze-O
Compass Game - Minesweepers
Compass Game - Three Legged Compass Walk
Compass Line Game
Determine Direction without a Compass
Distance Computer
Distance Computer Template
Introduction to GPS
Mini Orienteering Course
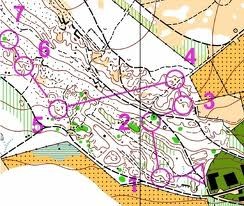
Orienteering
Orienteering Control Descriptions
Orienteering Control Practice Sheets
Orienteering Control Practice Sheets Answers
Orienteering Flashcards
Pacing
Topographic Map Symbol Brochure - USGS
USGS Topographic Maps
Using GPS with Paper Land Maps
Mini Orienteering Course
Orienteering
Orienteering Control Descriptions
Orienteering Control Practice Sheets
Orienteering Control Practice Sheets Answers
Orienteering Flashcards
Pacing
Topographic Map Symbol Brochure - USGS
USGS Topographic Maps
Using GPS with Paper Land Maps
You are visitor number
Since March 17, 2013
Scenario #3 - Retracing Your Steps to Camp:
You got to the summit and got some great photos, even one of a baby mountain goat. Now it's time to get back to your campsite. You could just follow your back bearing (see below) back to your location, but there is bound to be some error, when you hit the trail where will you be in relation to your campsite? The best bet is to intentionally aim off. Here's your procedure:
Back Bearings - To check your position while walking a bearing, you can take a back bearing. Before you start to walk on your bearing, turn around take a bearing 180° off of the bearing you are going to walk. For example, if you are going to walk a bearing of 45°, shoot a bearing directly opposite your course of 225°. Locate some landmark along this bearing. Once you have moved a short distance along your bearing, turn around and shoot a bearing back to that landmark. If you are on course, that bearing will still read 180° off your bearing of travel (in this case 225°). If it doesn't, it means that you are off course. Sailors and sea kayakers use back bearings all the time to check for lateral drift from wind or currents. Back bearings are also useful if you are heading out to someplace and then returning along the same line of travel. There are two basic formulas for calculating a back bearing.
Back to top
Scenario #2 - Heading to the Summit: You have been hiking along the trail and found a good campsite that is marked on the map. You see a summit ridge above treeline that looks like a great place for photographs, but there's a valley thick with Douglas fir between you and the summit. What you need to do is take a bearing from your current position to the summit and use that to travel through the forest. Here's your procedure:
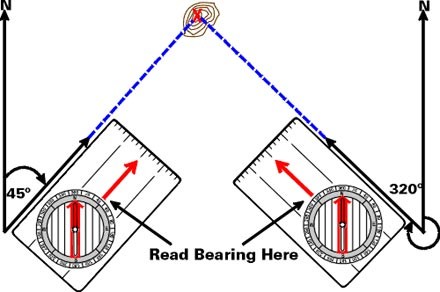
Taking a Bearing from the Land:
1. Point the compass direction of travel arrow to the destination on the land.
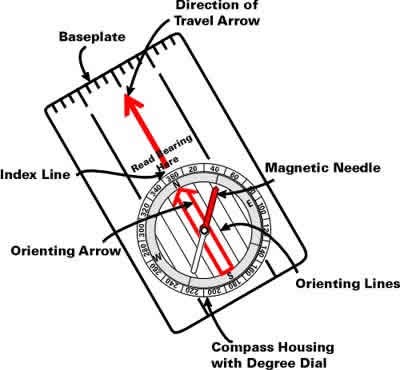
2. Rotate the compass housing until the north orienting arrow of the compass housing lines up with the red magnetic
needle. This is referred to as "boxing the needle," since you want the needle to be inside the box defined by the
orienting arrow. The north orienting arrow must be pointing in the same direction as the red (north) magnetic needle.
Your compass will look like the figure above with the needle boxed.
3. Read the bearing (in degrees) from the degree dial at the point on the compass base plate "Read bearing here."
Walking a Bearing Taken from the Land:
1. After taking the bearing, as described above, hold the compass level and in front of you, so that the direction of
travel arrow points to the destination.
2. Rotate your whole body until the magnetic needle lies directly over the orienting arrow. Make sure the north end of
the magnetic needle points to N on the compass housing. The direction of travel arrow points to the destination.
3. Site a prominent feature to which your direction of travel arrow points. Walk to that feature.
4. Continue to sight on other features along the bearing and walk to them, until you reach your destination.
Walking a Bearing Taken from the Map:
To walk a bearing taken from the map, you may need to correct for declination if you did not orient the map to magnetic north before you took your bearing. Once you have corrected for declination, follow the same procedure as indicated above for walking a bearing taken from the land.
Techniques for Walking a Bearing:
Sometimes the terrain isn't always so cooperative to let you just follow your bearing in a straight line so there are a number of techniques to use when traveling on a bearing.
Line of Sight - Walk to an obvious landmark-a tree or boulder that is directly on the bearing. Then take another bearing on the next obvious landmark and walk to that. Keep it up until you reach your destination. By going to intermediate landmarks, you minimize the chances of veering off your bearing.
Taking a Bearing from the Land:
1. Point the compass direction of travel arrow to the destination on the land.
2. Rotate the compass housing until the north orienting arrow of the compass housing lines up with the red magnetic
needle. This is referred to as "boxing the needle," since you want the needle to be inside the box defined by the
orienting arrow. The north orienting arrow must be pointing in the same direction as the red (north) magnetic needle.
Your compass will look like the figure above with the needle boxed.
3. Read the bearing (in degrees) from the degree dial at the point on the compass base plate "Read bearing here."
Walking a Bearing Taken from the Land:
1. After taking the bearing, as described above, hold the compass level and in front of you, so that the direction of
travel arrow points to the destination.
2. Rotate your whole body until the magnetic needle lies directly over the orienting arrow. Make sure the north end of
the magnetic needle points to N on the compass housing. The direction of travel arrow points to the destination.
3. Site a prominent feature to which your direction of travel arrow points. Walk to that feature.
4. Continue to sight on other features along the bearing and walk to them, until you reach your destination.
Walking a Bearing Taken from the Map:
To walk a bearing taken from the map, you may need to correct for declination if you did not orient the map to magnetic north before you took your bearing. Once you have corrected for declination, follow the same procedure as indicated above for walking a bearing taken from the land.
Techniques for Walking a Bearing:
Sometimes the terrain isn't always so cooperative to let you just follow your bearing in a straight line so there are a number of techniques to use when traveling on a bearing.
Line of Sight - Walk to an obvious landmark-a tree or boulder that is directly on the bearing. Then take another bearing on the next obvious landmark and walk to that. Keep it up until you reach your destination. By going to intermediate landmarks, you minimize the chances of veering off your bearing.
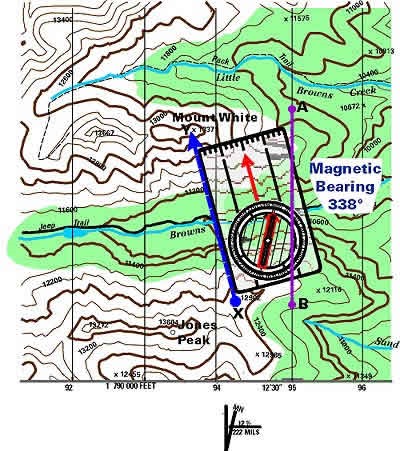
Taking a Bearing from the Map (Map Oriented to Magnetic North):
1. Orient the map with the compass.
2. Lay the long edge of the compass base plate on the map, making a line from the starting point to the destination
(from X to Y). Since the base plate is parallel to the direction of travel arrow, the base plate can be used to set the
direction to the destination.
3. Holding the baseplate steady, rotate the compass housing until the orienting arrow coincides with the North end of
the magnetic needle (known as "boxing the arrow").
4. Read the bearing (in degrees) from the degree dial at the point on the compass base plate marked "Read bearing
here." In this case the bearing is 338°.
Tricks of the Trail
Orient Your Map: You can eliminate the need to correct for declination if you use your compass to orient the map each time. As long as the map is oriented with respect to magnetic north, any bearings you take from map to compass or compass to map will be the same. For this reason, it's a good idea to always take the time to orient your map. It will make your life much easier. It also means that each time you use your map, your will need to re-orient it with your compass.
Real Life Scenarios
Let's look at some common backcountry scenarios and see how you can use your map and compass to navigate.
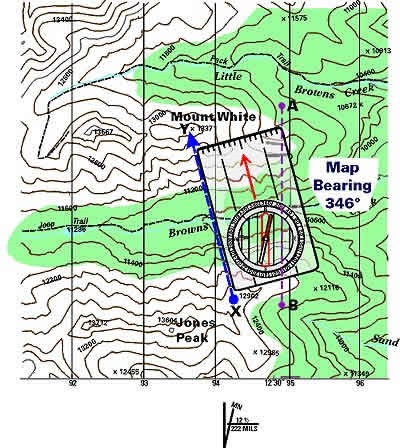
Scenario #1 - Lost in the Fog: Okay, you hike in along the trail and then bushwack off trail to a nearby alpine lake to camp. When you wake up the next morning, you are fogged in. You know where you are on the map, but you can't see to find your way out. What you need to do is take a bearing on your map from your known campsite back to a known point on the trail that you can identify on the map. Then follow your bearing through the fog. Here's your procedure:
Taking a Bearing from the Map (Map Not Oriented):
1. Lay the long edge of the compass base plate on the map, making a line from the starting point to the destination (from point X to point Y). Since the base plate is parallel to the direction of travel arrow, the base plate can be used to set the direction to the destination.
2. Holding the base plate steady, rotate the compass housing until the compass orienting lines and orienting arrow are pointing to true north. Here you see the orienting lines and arrow are parallel to the line from A to B as well as to the map gridlines. 3. Read the bearing (in degrees) from the degree dial at the point on the compass base plate marked "Read bearing here." In this case the bearing is 346°.
Orient Your Map: You can eliminate the need to correct for declination if you use your compass to orient the map each time. As long as the map is oriented with respect to magnetic north, any bearings you take from map to compass or compass to map will be the same. For this reason, it's a good idea to always take the time to orient your map. It will make your life much easier. It also means that each time you use your map, your will need to re-orient it with your compass.
Real Life Scenarios
Let's look at some common backcountry scenarios and see how you can use your map and compass to navigate.
Scenario #1 - Lost in the Fog: Okay, you hike in along the trail and then bushwack off trail to a nearby alpine lake to camp. When you wake up the next morning, you are fogged in. You know where you are on the map, but you can't see to find your way out. What you need to do is take a bearing on your map from your known campsite back to a known point on the trail that you can identify on the map. Then follow your bearing through the fog. Here's your procedure:
Taking a Bearing from the Map (Map Not Oriented):
1. Lay the long edge of the compass base plate on the map, making a line from the starting point to the destination (from point X to point Y). Since the base plate is parallel to the direction of travel arrow, the base plate can be used to set the direction to the destination.
2. Holding the base plate steady, rotate the compass housing until the compass orienting lines and orienting arrow are pointing to true north. Here you see the orienting lines and arrow are parallel to the line from A to B as well as to the map gridlines. 3. Read the bearing (in degrees) from the degree dial at the point on the compass base plate marked "Read bearing here." In this case the bearing is 346°.
Back to top
Using Map and Compass Together
Adjusting Your Compass for the Local Declination
Another way to deal with declination is to adjust your compass. Some compasses have an outer degree ring that can be unlocked either with a set screw or a latch. This allows you to reset the compass to account for declination. For example, if the declination were 14° East, you could rotate the degree dial to the right so that the magnetic needle was pointing to 14° instead of 360°. Once you do this, you will no longer have to add or subtract for declination because your compass is aligned to true north. Now when the compass needle is inside the orienting needle, the compass bearing that you read off your compass will be in relation to true north instead of magnetic north. If you have a fixed-ring compass, you can mark the declination angle on the compass ring with a piece of tape.
Check Your Position Regularly
Make it a habit of keeping your map and compass handy and refer to them every hour or so to locate your position (more often in low visibility). Keep track of your starting time, rest breaks and lunch stops, and general hiking pace. This will also give you an idea of how far you have traveled and whether your Time Control Plan is accurate.
Orienting the Map:
It is easiest to read a map if the map is oriented to the surrounding landscape. If you see a valley on your left, then the valley shows on the left on the map. You can do this by eye or with your compass.
Using Land Features: Lay the map on the ground or hold it horizontally. Rotate the map until recognized features on the ground roughly align with those on the map.
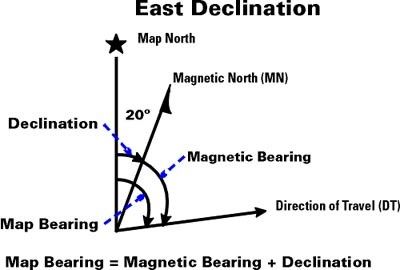
East Declination
If your declination is east then magnetic north is greater than true north the map bearing is greater than the magnetic bearing. You need to make the two world's equivalent by adding or subtracting the declination.
Map Bearing to Magnetic Bearing: If you are taking a bearing from one point on your map to another point on the map with respect to true north, then you are working with the map bearing. Now you want to figure out where your position is in the magnetic bearing. In order to transfer this information back to your magnetic bearing you need to subtract the declination from your map bearing compass bearing to create the proper magnetic bearing. Map bearing - Declination = Magnetic Bearing.
Magnetic Bearing to Map Bearing: If you use your compass to take a bearing from your current position to a point on the landscape, then you are working with the magnetic bearing. Now you want to figure out where your position is on the map. In order to transfer this information back to your map you need to add the declination from your magnetic bearing compass bearing to create the proper map bearing. Magnetic bearing + Declination = Map Bearing.
Map Bearings and Magnetic Bearings
If, you think about your map as an artist's rendition of the world. It displays true north, but it doesn't include magnetic fields as the real world does, so you need to make accommodations when going from your map to the real world. The real world doesn't have a true north-it's merely a construct of the map-so you have to make accommodations when going from the real world to your map.. The basic principle is this: to correct for declination, you want the map bearing and the magnetic bearing to be equivalent. If you are lucky enough to be on the line where the declination is 0°, both are already equivalent, or if you orient your map with your compass then you have made the two equivalent. Otherwise, you will need to make your own bearing corrections by adding or subtracting the declination amount. That gives us 4 possible permutations to work with:
1. West Declination - Going from a Map Bearing to a Magnetic Bearing
2. West Declination - Going from a Magnetic Bearing to a Map Bearing
3. East Declination - Going from a Map Bearing to a Magnetic Bearing
4. East Declination - Going from a Magnetic Bearing to a Map Bearing
Bearings
The compass is used primarily to take bearings. A bearing is a horizontal angle measured clockwise from north (either magnetic north or true north) to some point (either a point on a map or a point in the real world). Bearings are used to accurately travel to a destination or to locate your position. If you are working from your map, it is called a map bearing and the angle you are measuring is the angle measured clockwise from true north on your map to this other point on the map. If you are taking a bearing off a real point on the landscape with a compass, you are using your compass to measure the angle clockwise from magnetic north to this point on the landscape. This is called a magnetic bearing. Remember that the bearing is measured clockwise. If you think of true north as 12 o'clock then a bearing to the right of that (1 o'clock) is greater than true north and a bearing to the left of True north (11 o'clock) is less than true north.
The compass is used primarily to take bearings. A bearing is a horizontal angle measured clockwise from north (either magnetic north or true north) to some point (either a point on a map or a point in the real world). Bearings are used to accurately travel to a destination or to locate your position. If you are working from your map, it is called a map bearing and the angle you are measuring is the angle measured clockwise from true north on your map to this other point on the map. If you are taking a bearing off a real point on the landscape with a compass, you are using your compass to measure the angle clockwise from magnetic north to this point on the landscape. This is called a magnetic bearing. Remember that the bearing is measured clockwise. If you think of true north as 12 o'clock then a bearing to the right of that (1 o'clock) is greater than true north and a bearing to the left of True north (11 o'clock) is less than true north.
Using Map and Compass
Even after years of using a map and compass I could never remember how to correct for declination. Do I add declination or subtract it? What if I'm out west versus in the east? While navigating through dense fog on a sea kayaking trip, I finally came up with an easy way to remember. As long as you remember the basic principles, you can easily work it out in your head.
What's your Map Declination?
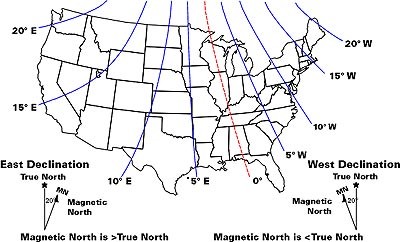
The first thing you need to know is where you are in relation to magnetic north. You can find this information by looking on your map legend. If you look at the map of North America in below you will see the line roughly marking 0° declination. If you are on the line where the declination is 0°, then you don't have to worry about any of this, since magnetic north and map north are equivalent. (Wouldn't it be nice if all your trips were on the 0° of declination line?) If you are to the right of that line, your compass will point toward the line (to the left) and hence the declination is to the west. If you are to the left of the line, your compass will point toward the line (to the right) and hence the declination is to the east.
Back to top
Even after years of using a map and compass I could never remember how to correct for declination. Do I add declination or subtract it? What if I'm out west versus in the east? While navigating through dense fog on a sea kayaking trip, I finally came up with an easy way to remember. As long as you remember the basic principles, you can easily work it out in your head.
What's your Map Declination?
The first thing you need to know is where you are in relation to magnetic north. You can find this information by looking on your map legend. If you look at the map of North America in below you will see the line roughly marking 0° declination. If you are on the line where the declination is 0°, then you don't have to worry about any of this, since magnetic north and map north are equivalent. (Wouldn't it be nice if all your trips were on the 0° of declination line?) If you are to the right of that line, your compass will point toward the line (to the left) and hence the declination is to the west. If you are to the left of the line, your compass will point toward the line (to the right) and hence the declination is to the east.
Back to top
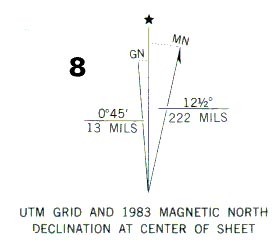
Declination
You can see that location makes a great deal of difference in where the compass points. The angular difference between true north and magnetic north is known as the declination and is marked in degrees on your map. Depending on where you are, the angle between true north and magnetic north is different. In the U.S., the angle of declination varies from about 20° west in Maine to about 21° east in Washington. The magnetic field lines of the earth are constantly changing, moving slowly westward (½ to 1° every five years). This is why it is important to have a recent map. An old map will show a declination that is no longer accurate, and all your calculations using that declination angle will be incorrect. As you will see, understanding this distinction becomes important when navigating with a map and a compass.
Buy Your Compass for the Right Area
As well as the magnetic deviation east or west, compasses also show a vertical "dip" up and down. This dip varies in different parts of the world and compasses are specially calibrated for that dip. So you can't take a compass made for North America and use it in South America and get accurate readings.
Which North to Use
So we have two types of north to contend with. When you look at your map, it is drawn in relation to true north; when you look at your compass, it points to magnetic north. To make the map and compass work together you must decide on one North as your point of reference and base all your calculations on that. As you can see the following chart, failure to take declination into account can put you way off target.
Back to top
What is North?
No, this is not a silly question, there are two types of north.
True North: (also known as Geographic North or Map North - marked as H on a topographic map) is the geographic north pole where all longitude lines meet. All maps are laid out with true north directly at the top. Unfortunately for the wilderness traveler, true north is not at the same point on the earth as the magnetic north Pole which is where your compass points.
Magnetic North: Think of the earth as a giant magnet (it is actually). The shape of the earth's magnetic field is roughly the same shape as the field of a bar magnet. However, the earth's magnetic field is inclined at about 11° from the axis of rotation of the earth, so this means that the earth's magnetic pole doesn't correspond to the Geographic North Pole and because the earth's core is molten, the magnetic field is always shifting slightly. The red end of your compass needle is magnetized and wherever you are, the earth's magnetic field causes the needle to rotate until it lies in the same direction as the earth's magnetic field. This is magnetic north (marked as MN on a topographic map). If you locate yourself at any point in the U.S., your compass will orient itself parallel to the lines of magnetic force in that area.
Measuring Distances
There are a number of ways to measure distance accurately on a map. One is to use a piece of string or flexible wire to trace the intended route. After tracing out your route, pull the string straight and measure it against the scale line in the map legend. Another method is to use a compass (the mathematical kind) set to a narrow distance on the map scale like ½ mile and then "walk off" your route. It is a good idea to be conservative and add 5-10% of the total distance to take into account things like switchbacks that don't appear on the map. It's better to anticipate a longer route than a shorter one.
Using the Compass
The compass consists of a magnetized metal needle that floats on a pivot point. The needle orients to the magnetic field lines of the earth. The basic orienteering compass is composed of the following parts:
* Base plate
* Straight edge and ruler
* Direction of travel arrow
* Compass housing with 360° markings
* North label
* Index line
* Orienting arrow
* Magnetic needle (north end is red)
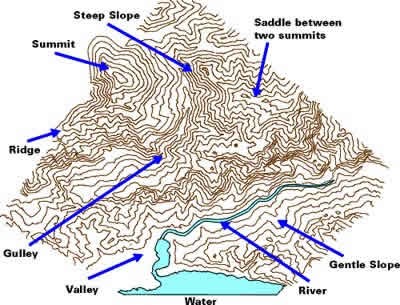
* Steep slopes - contours are closely spaced
* Gentle slopes - contours are less closely spaced
* Valleys - contours form a V-shape pointing up hill - these V's are an indication of a drainage path which could also
be a stream or river.
* Ridges - contours form a V-shape pointing down the hill
* Summits - contours forming circles
* Depressions - are indicated by circular contour with lines radiating to the center
Back to top
Back to top
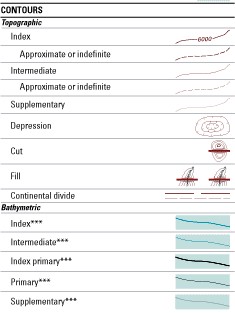
Contour Lines
Contour lines are a method of depicting the 3-dimensional character of the terrain on a 2-dimensional map. Just like isobars in the atmosphere depict lines of equal atmospheric pressure, contour lines drawn on the map represent equal points of height above sea level.
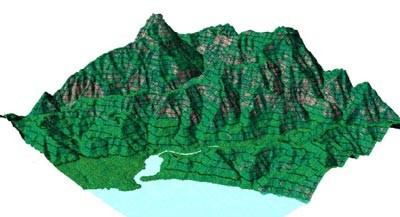
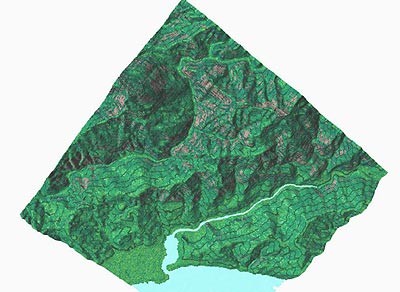
Look at the three-dimensional drawing of the mountain below. Imagine that it is an island at low tide. Draw a line all around the island at the low tide level. Three hours later, as the tide has risen, draw another line at the water level and again three hours later. You will have created three contour lines each with a different height above sea level. As you see below, the three dimensional shape of the mountain is mapped by calculating lines of equal elevation all around the mountain, and then transferring these lines onto the map.
On multi-colored maps, contour lines are generally represented in brown. The map legend will indicate the contour interval-the distance in feet (meters, etc.) between each contour line. There will be heavier contour lines every 4th or 5th contour line that are labeled with the height above sea level. The images below illustrate how a variety of surface features can be identified from contour lines.
Contour Lines
Contour lines are a method of depicting the 3-dimensional character of the terrain on a 2-dimensional map. Just like isobars in the atmosphere depict lines of equal atmospheric pressure, contour lines drawn on the map represent equal points of height above sea level.
Look at the three-dimensional drawing of the mountain below. Imagine that it is an island at low tide. Draw a line all around the island at the low tide level. Three hours later, as the tide has risen, draw another line at the water level and again three hours later. You will have created three contour lines each with a different height above sea level. As you see below, the three dimensional shape of the mountain is mapped by calculating lines of equal elevation all around the mountain, and then transferring these lines onto the map.
On multi-colored maps, contour lines are generally represented in brown. The map legend will indicate the contour interval-the distance in feet (meters, etc.) between each contour line. There will be heavier contour lines every 4th or 5th contour line that are labeled with the height above sea level. The images below illustrate how a variety of surface features can be identified from contour lines.
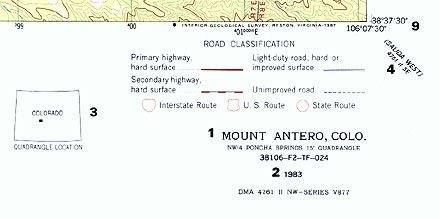
The map legend contains a number of important details. The figures below display a standard USGS map legend. In addition, a USGS map includes latitude and longitude as well as the names of the adjacent maps (depicted on the top, bottom, left side, right side and the four corners of the map). The major features on the map legend are show below.
1. Map Name
2. Year of Production and Revision
3. General Location in State
4. Next Adjacent Quadrangle Map
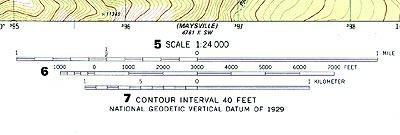
5. Map Scale
6. Distance Scale
7. Contour Interva
8. Magnetic Declination
9. Latitude and Longitude
1. Map Name
2. Year of Production and Revision
3. General Location in State
4. Next Adjacent Quadrangle Map
5. Map Scale
6. Distance Scale
7. Contour Interva
8. Magnetic Declination
9. Latitude and Longitude
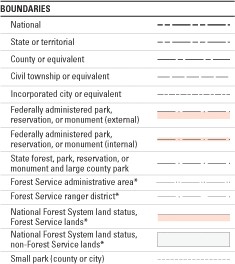
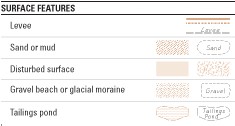
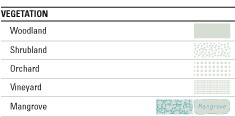
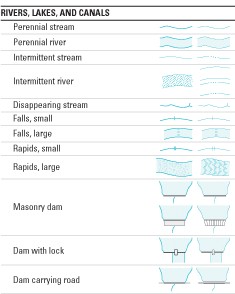
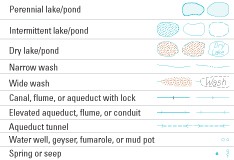
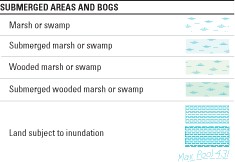
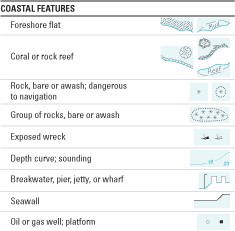
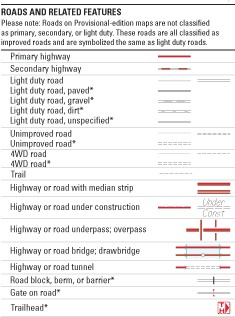
Map Symbols and Colors:
USGS topographic maps use the following symbols and colors to designate different features
* Black - man-made features such as roads, buildings, etc.
* Blue - water, lakes, rivers, streams, etc.
* Brown - contour lines
* Green - areas with substantial vegetation (could be forest, scrub, etc.)
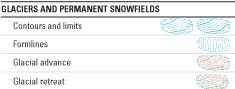
* White - areas with little or no vegetation; white is also used to depict permanent snowfields and glaciers
* Red - major highways; boundaries of public land areas
* Purple - features added to the map since the original survey. These features are based on aerial photographs but
have not been checked on land.
Back to top
Map Legend
USGS topographic maps use the following symbols and colors to designate different features
* Black - man-made features such as roads, buildings, etc.
* Blue - water, lakes, rivers, streams, etc.
* Brown - contour lines
* Green - areas with substantial vegetation (could be forest, scrub, etc.)
* White - areas with little or no vegetation; white is also used to depict permanent snowfields and glaciers
* Red - major highways; boundaries of public land areas
* Purple - features added to the map since the original survey. These features are based on aerial photographs but
have not been checked on land.
Back to top
Map Legend
Scale
All maps will list their scales in the margin or legend. A scale of 1:250,000 (be it inches, feet, or meters) means that 1 unit on the map is the equivalent of 250,000 units in the real world. So 1 inch measured on the map would be the equivalent of 250,000 inches in the real world. Most USGS maps are either 1:24,000, also known as 7 ½ minute maps, or 1:62,500, known as 15 minute maps (the USGS is no longer issuing 15 minute maps although the maps will remain in print for some time).
Standard topographic maps are usually published in 7.5-minute quadrangles. The map location is given by the latitude and longitude of the southeast (lower right) corner of the quadrangle. The date of the map is shown in the column following the map name; a second date indicates the latest revision. Photo-revised maps have not been field checked.
Latitude and Longitude
Maps are drawn based on latitude and longitude lines. Latitude lines run east and west and measure the distance in degrees north or south from the equator (0° latitude). Longitude lines run north and south intersecting at the geographic poles. Longitude lines measure the distance in degrees east and west from the prime meridian that runs through Greenwich, England. The grid created by latitude and longitude lines allows us to calculate an exact point using these lines as X axis and Y axis coordinates.
Both latitude and longitude are measured in degrees (°).
1° = 60 minutes
1 minute = 60 seconds
Therefore:
7 ½ minutes = 1/8 of 60 minutes = 1/8 of a degree
15 minutes = ¼ of 60 minutes = ¼ of a degree
Back to top
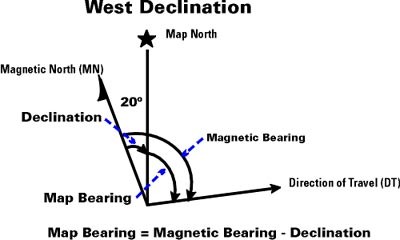
West Declination
If your declination is west, then magnetic north is less than true north and the map bearing is less than (<) the magnetic bearing . You need to make the two bearings equivalent by adding or subtracting the declination.
Map Bearing to Magnetic Bearing: If you are taking a bearing from one point on your map to another point on the map with respect to true north, then you are working with the map bearing. Now you want to figure out where your position is in the magnetic bearing. In order to transfer this information back to your magnetic bearing you need to add the declination to your map bearing to create the proper magnetic bearing. Map bearing + Declination = Magnetic Bearing.
Magnetic Bearing to Map Bearing: If you use your compass to take a bearing from your current position to a point on the landscape, then you are working with the magnetic bearing. Now you want to figure out where your position is on the map. In order to transfer this information back to your map you need to subtract the declination from your magnetic bearing compass bearing to create the proper map bearing. Magnetic Bearing - Declination = Map Bearing
Using a Compass
1. Identify your declination from your map. If your declination is West of true north, subtract the declination from 360°.
If your declination is East of true north.
2. Set the compass at the correct declination bearing so that you compensate for declination.
3. Place your compass on the map so that the edge of the baseplate lies is parallel to the east or west edge of the
map with the direction of travel arrow toward the north edge of the map.
4. Holding the compass on the map, rotate the map with the compass until the north end of the magnetic needle
points to the N on the compass housing (i.e. the red north end of the magnetic needle and the orienting arrow
align). This is often referred to as "boxing the needle" since the magnetic needle is inside the "box" formed by the
orienting arrow. The map is now oriented with respect to magnetic north. This means that the compass needle
direction north is the same as true north on the map. You can also place the compass on the map so that the edge
of the baseplate lies along the magnetic north indicator line on the map legend at the bottom and rotate the map as
described above. This may give you a more accurate orientation for your map.
Identify Terrain Features
With the map oriented, look around for prominent features landscape features such as mountains, valleys, lakes, rivers, etc. Make a mental note of the geographical features you will be traveling along and seeing during the day. If you keep the terrain in your mind, you will usually have a general idea of where you are just by looking around.
Back to top